
Characters & riggingAnimation & visuals
How to save and reuse character poses in Blender
Save a wave, a point and a listening pose on James, then use the gestures in another Blender shot.
Save a wave or pointing gesture as an upper-body pose asset. In a second shot, you can apply the gesture, turn the character toward a different slide, and keep his feet planted.
This exercise uses James from Jennifer and James. Start with three poses you can recognize from across the room: Welcome, Point, and Listen. Save each as an upper-body pose so it can work with a different stance.

The controls around the character let you pose James in Blender. Keep the feet and master control out of the selection when saving an upper-body gesture.
Find three starting poses
Open a working copy of the James Blender file. Select the character’s animation rig and switch to Pose Mode. In the James file we inspected, the animation rig is named R_ShapeKeys. The scene also contains a metarig, so check which object you have selected before moving a control.
The file includes an action named James_poses. In a working copy, switch a Dope Sheet editor to Action Editor and choose that action for the animation rig. In the copy we inspected, frame 14 holds Standing waving, frame 5 holds Standing pointing side, and frame 3 holds Standing confident. Scrub through them with the camera view open. For each exercise below, capture the pose before you change frames.
| Pose to save | Start here | Check from the camera |
|---|---|---|
| Welcome | Use the waving pose. Adjust the wrist so the palm is readable. | Is there a strip of background between the hand and the cheek? At presentation size a hand crossing the face can hide the eyes. |
| Point | Use the sideways point. Put a temporary card beside James where the diagram will go. | Follow the fingertip across the frame. Does it lead to the intended part of the card? Move the card or adjust the shoulder before bending the wrist farther. |
| Listen | Begin with the confident stance. Turn the head toward an imagined speaker and angle it slightly. | Does the direction of the gaze read with the audio muted? Keep the shoulders quiet enough for the head turn to show. |
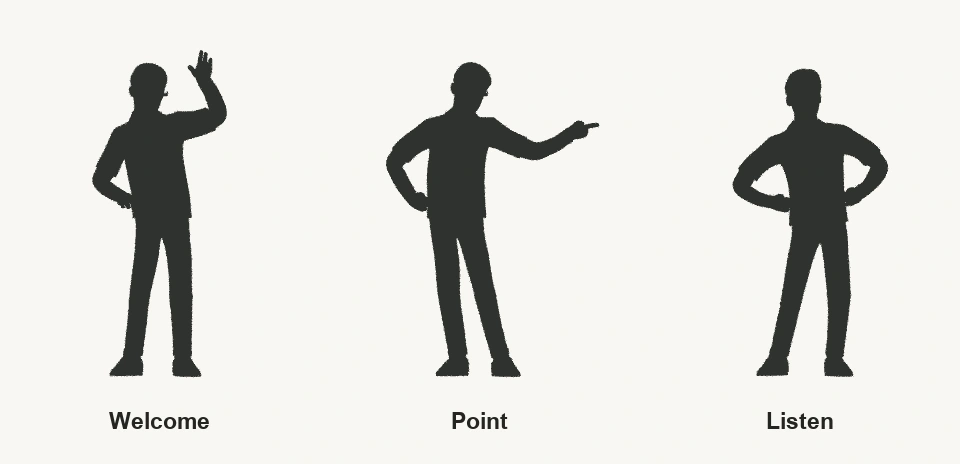
These silhouettes came from the James file in Blender 5.2. The wave and sideways point have distinct outlines. The listening pose uses the confident stance with a small head turn, so it reads best in a closer shot.
For a close-up of Listen, save the head turn separately from the blink. That lets you change when James blinks in each shot. On a character with ARKit shape keys, test the left and right blinks in Blender before you key their timing.
Create a pose asset from the selected controls
- With James in Pose Mode, select the controls that define the gesture. For the wave or point, include the hand and fingers, the arm controls you moved, and any elbow target that sets the bend. Include the chest or head if their angle belongs to the gesture. Leave the master control, feet and unrelated facial controls unselected.
- With the pointer over the 3D Viewport, press F3, search for Create Pose Asset, and run it. Choose Current File as the destination if Blender asks. In the Asset Browser, select Current File, find the new pose, and rename it
James – Welcome. - Set up the next pose, recheck the selected controls, and repeat for
James – PointandJames – Listen. Save the working file.

The supplied set includes more than 20 poses per character. A gesture from that set can be the starting point for an asset tailored to your shot.
Apply the gesture in a second shot
Save a second copy for the new shot. In the Action Editor, switch from James_poses to your shot’s action. For a new shot with no action yet, unlink James_poses from the rig using the X beside the action name, then click New and give the new action a shot-specific name. Keys you add will now belong to the shot.
Give James a different position in the frame, turn off Auto Keying while you experiment, and enter Pose Mode. Deselect all bones, then double-click James – Point in the Asset Browser. With no bones selected, Blender can apply every channel stored in that pose. The root and feet retain their placement if you left them out when creating the asset.
Now try a partial change. Apply Welcome, select only the head control, and apply Listen. If Listen contains the head, its angle should change while the waving hand stays up. To record the result in an animation, insert keys on the desired controls in your shot’s action. Scrub away from the frame and return to check the keys held. Blender Pose Library manual
In our Blender 5.2 check, we saved these three assets using 47 upper-body controls on James. After clearing their transforms and moving his root, we reapplied each asset. All 47 controls returned to their saved transforms each time, and the root kept its new position.

Follow the line from the elbow through the fingertip. If the diagram sits below that line in your second shot, adjust the upper arm and check the silhouette again.
If the hand barely moves when you apply a pose, first deselect all bones and try again. If the elbow swings to the wrong side, compare the arm’s IK/FK setting and the elbow target with their state in the source shot. If the feet jump, recreate the asset with a narrower selection. Finally, play the gesture at the size your viewer will see. Check that the hand clears the face in the final framing.
Can you reuse a pose on a different rig?
Rigify to Rigify, or Auto-Rig Pro to Auto-Rig Pro. Try the pointing hand first. In a copy of the destination file, make the pose available through the Asset Browser, select the matching hand control in Pose Mode, and apply the pose. Blender looks up the channels by name. Two characters built with the same rigging system can have different finger controls, rotation axes, or IK/FK settings. If the wrist turns as expected, test the rest of the arm. Check where the fingertip lands, especially if the second character has longer arms.

Use the destination rig to check which controls drive the wrist and elbow. Matching silhouettes alone cannot tell you whether the controls share names or axes.
Auto-Rig Pro to Rigify. Auto-Rig Pro’s Remap tool supports a Rigify target. Start with a short keyed action on the source rig, such as a point held for two frames. Assign the animated armature as the source and the generated Rigify armature as the target. Compare their rest poses and facing direction, then map the source bones to the target controls. The bundled mapping presets assume an Auto-Rig Pro target, so check the mapping yourself when Rigify receives the motion. Retarget the short action, inspect the wrist and elbow at the held frame, then save the corrected gesture as a pose asset on the destination rig. This is the add-on’s documented workflow. Our 47-control test above used James in both shots. Auto-Rig Pro Remap manual
Use the Jennifer and James character pack
The pack includes both rigged characters and more than 20 poses for each. Start with the supplied wave or point, then save the controls you want to reuse. If your shot calls for a specific handoff, a hand landing on a prop, or a gesture timed to dialogue, ask ThreeDee about custom poses or animation. Include a reference frame and tell us which rig the motion needs to fit.